
Project Tomorrow Crafting: Workbench, Gear and Priorities
How crafting works in Project Tomorrow, what to make at the workbench first, and which consumables, weapons and housing components are worth the resources.
Crafting in Project Tomorrow runs through the Workbench and the CRAFT screen. The workbench unlocks suit upgrades, weapons and consumables; the Housing Frame is the one recipe with a confirmed demo cost of one Iron and one Magnetite. Source: Project Tomorrow on Steam ↗
Project Tomorrow's crafting is not a giant tech tree. It is a small set of practical items: oxygen, water, food, medical supplies, housing components, weapons and suit upgrades. The interesting part is the order. Spend your early Silicone on a workbench and you can carry a medical item into the first wave; spend it on a second emitter and you may have a safer map but a weaker character.
This guide explains the crafting surfaces, the items visible in the demo, and a priority list that keeps the first region moving.
The Workbench
The Workbench is the crafting hub. In the demo it costs one Silicone, which makes it the cheapest permanent upgrade in the game. Build it after the first windmill and oxygen emitter, before you add a second turret.
The workbench unlocks:
- Suit upgrades — improve your survivability and utility.
- Weapons — better ranged and melee options than the starting Pulse Pistol.
- Consumables — oxygen, water, food, medical items and power supplies.
- Housing components — the Housing Frame used to build Habitats.
You do not need to unlock everything at once. The workbench is a menu, not a single purchase.
The CRAFT screen
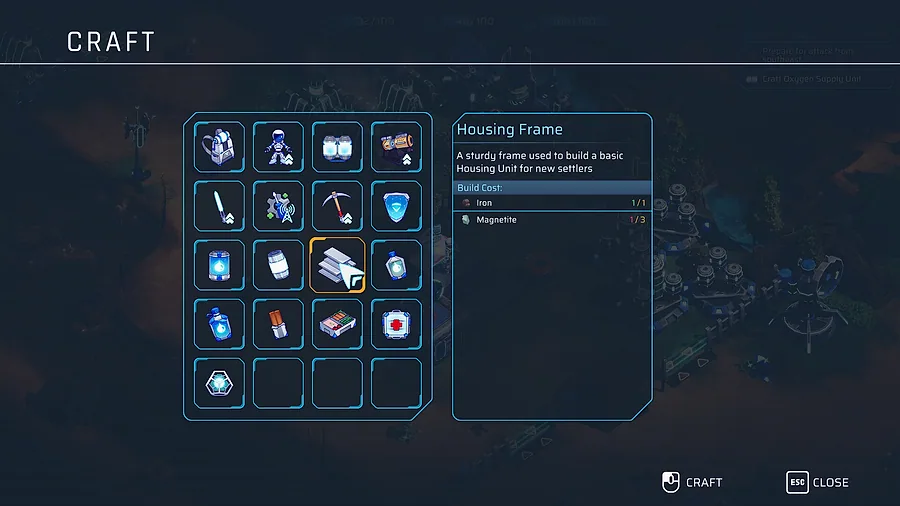
The CRAFT screen is a grid of item tiles with a resource strip along the top. Select a tile to see its cost and requirements. The demo's interface shows the Housing Frame recipe clearly: one Iron and one Magnetite. Other recipes are gated by materials rather than by a research tree.
The screen also shows your current resource totals, which is useful for planning. If a recipe is greyed out, the missing material is usually visible in the strip. Do not assume a bug; check the base resources as well as the ores.
What to craft first
A practical first-region order:
- Oxygen supply unit — one for the first expedition outside the green zone. It is the difference between a bad path and a death.
- Medical item — one for the first wave. Use it when health is low, not when it is full.
- Clean water — two units before any long trip. Dirty water damages health.
- Housing Frame — one, when you are ready to build your first Habitat after a survived wave.
- Weapon upgrade — when the workbench offers a better ranged option and you have the materials.
- Suit upgrade — when you are dying to chip damage rather than to a breach.
Do not craft a large stock of consumables before you know how much you need. Inventory space is limited, and a stack of rations is not a defense.
Housing Frames and Habitat costs
Housing is the population gate. A Habitat consumes a Housing Frame and Oxygen, and the Oxygen cost rises with each additional Habitat. In the demo, the frame costs one Iron and one Magnetite; the Habitat itself costs roughly 5,000 Oxygen at the first build and more thereafter.
That means housing is a chain:
- Gather Iron and Magnetite.
- Craft a Housing Frame.
- Ensure the base has enough Oxygen.
- Place the Habitat inside the green zone and the power grid.
- Survive a wave to convert the housing into population.
A Habitat placed before a wave does not add population until the wave is survived. Do not build three at once and assume the goal is met.
Weapons and gear
Your starting Pulse Pistol automatically acquires targets. It is reliable but not powerful. The workbench offers better ranged weapons, melee options and suit upgrades. The demo's item icons include a pickaxe, a sword, a shield and a power cell, which suggests a mix of tools, melee gear and energy equipment.
The character is a supplement to the turrets, not a replacement. A better weapon helps you finish stragglers and defend a breach; it does not let you solo a wave. Spend accordingly. If you have a choice between a weapon upgrade and a turret that covers the gate, build the turret first.
Tools and utility items
The pickaxe is the gathering tool. The power cell suggests energy storage or a portable power source. The shield suggests personal defense. These items are visible in the demo's crafting grid, but their exact recipes and stats are not published.
Treat utility items as convenience, not core progression. The core progression is power, terraforming, defense and housing. A tool that saves you ten seconds per trip is nice; a turret that saves the emitter is essential.
Inventory upgrades
Backpack upgrades increase capacity, and the demo's first upgrade is a large quality-of-life jump. Each level adds storage, which reduces trips and lets you carry more consumables.
Prioritize the first backpack upgrade before a long expedition. It costs resources you will recover quickly and pays for itself in fewer oxygen-draining trips.
Crafting and the Resource Uplink
The Resource Uplink lets you use stored materials from a distance. That means you can craft at a forward workbench without carrying every ore. It does not remove the need for a local power source or a defended position.
Build a storage container near the workbench and connect it to the network. Then keep your bulk materials in storage and carry only what the current trip needs. The resources guide→ explains the storage chain.
What not to craft
- A second weapon before a second turret. Turrets defend the base; weapons defend you.
- Cosmetic or low-impact gear before housing. Population is the region goal.
- A full consumable stack before storage. You will run out of slots.
- Housing Frames you cannot place. The Oxygen cost rises; a frame in storage is not population.
Crafting in later regions
Tidehaven adds automation and new turrets, and Winterbloom adds heavy enemies. The crafting priorities shift toward:
- Interceptor components for flying enemies.
- Nova Mortar components for area damage.
- Thermal Drill upgrades for Heat.
- Settlement supplies for population growth.
The workbench remains the hub, but the materials become more specialized. Keep a storage buffer of each ore so a new recipe does not stall your progression.
If you are still choosing what to build first, the beginner guide→ puts the workbench in the correct order. If you are short on a material, the resources guide→ explains where it goes.
FAQ
What does the Workbench do in Project Tomorrow?
It unlocks suit upgrades, weapons, consumables and housing components. It is the main crafting station.
What is the Housing Frame recipe?
In the demo, one Iron and one Magnetite. The Habitat also consumes Oxygen, and the cost rises with each additional Habitat.
Should I craft a weapon or a turret first?
A turret. The character supports the defense; turrets are the defense.
Can I craft without a workbench?
The workbench is the crafting hub. Some recipes may be available elsewhere, but the demo routes crafting through it.
Sources
- Project Tomorrow on Steam ↗
- Project Tomorrow Steam news ↗
- Project Tomorrow achievements ↗
- Wolfman Mazy demo gameplay ↗
Official source: Project Tomorrow on Steam ↗ Project Tomorrow guides and walkthroughs